Isolated Footing 2.0
The BimSpeed.STR → Foundation → Isolated Footing 2.0 ribbon label opens a multi-layer foundation/slab reinforcement editor. The selection filter accepts Structural Floors with Structural=1 and Structural Foundation elements. It is separate from classic Isolated Footing.
Workflow
- Save a clean copy. Select suitable foundations or structural floors and Finish; inspect each boundary and thickness under Geometry Info.
- Select a host and set cover and layer names under General Settings. Use Draw for required optional roles and review the Top/Bottom meshes separately.
- Edit Top, Bottom, Reinforcement, Side Vertical, Side Horizontal, Construction and Other Construction tables. Compare Qty and @Act.
- Optionally use Quick Layout for checked hosts. Return to the main table and verify overrides after Apply.
- Create Rebar and inspect plan, sections and 3D. Count by host, role and set; verify diameter, pitch and Partition in Properties, then save.
Select the scope before editing
Click an X or Y row to make that foundation current; the rows are not two separate foundations. The upper tables follow the selected group. Before copying, note the source Mark and dimensions, then select another foundation to check the copied settings.
| Field / button | Units / options | Condition and scope | Effect and verification |
|---|---|---|---|
| Foundation list / X, Y rows | selection | selected foundation/group | Selects the current host; read Name/Size and layer summaries. Highlighting a row does not establish the generation scope. |
| Create Rebar | action | all foundations in loaded groups | Generation processes every foundation in the window groups. For a one-host trial, select only that host when opening the command; do not rely on the highlighted row. Check each new set’s Host Mark. |
| Copy settings to all foundations | context menu | other listed groups | Copies current settings to other groups without changing host geometry. Inspect covers, both directions and roles on each target before creating. |
| Delete custom settings | context menu | selected foundation/group | Removes custom settings according to the tool logic. It is not Revit’s Delete Rebar command; inspect restored table values before generating. |
| Language | English / Tiếng Việt | window | Changes UI labels; layer names, Mark, Level and type names can remain unchanged as data. |
| Close | action | window | Closes the window; it does not save the RVT or establish that bars were generated. |
General and Geometry: establish the geometry first
Geometry Info shows read-only host Mark, Length, Width and Thickness. Compare Type Properties and a Revit section. A family bounding box can include blinding or pile components and exceed the structural body; inspect the actual concrete faces. Top cover, bottom cover and bar diameters must fit the thickness; an apparently tidy canvas does not replace that check.
| Field / button | Units / options | Condition and scope | Effect and verification |
|---|---|---|---|
| Partition | text | selected foundation/group | Rebar partition data; changing text does not move the host. Check Partition on new sets. |
| Level | text | selected foundation/group | Level information for bars, not host elevation. Check data and geometry separately. |
| Top Cover | mm | selected foundation/group | Cover at the named face; increasing it reduces bar space. Measure concrete face to bar surface in section and allow for both crossing bar diameters. |
| Bottom Cover | mm | selected foundation/group | Cover at the named face; increasing it reduces bar space. Measure concrete face to bar surface in section and allow for both crossing bar diameters. |
| Side Cover | mm | selected foundation/group | Cover at the named face; increasing it reduces bar space. Measure concrete face to bar surface in section and allow for both crossing bar diameters. |
| Top Layer | text | selected foundation/group | Data label for this role, not a physical layer count. Use distinct names for filtering and inspect the parameters actually written by the tool. |
| Bottom Layer | text | selected foundation/group | Data label for this role, not a physical layer count. Use distinct names for filtering and inspect the parameters actually written by the tool. |
| Reinforce Layer | text | selected foundation/group | Data label for this role, not a physical layer count. Use distinct names for filtering and inspect the parameters actually written by the tool. |
| Side V Layer | text | selected foundation/group | Data label for this role, not a physical layer count. Use distinct names for filtering and inspect the parameters actually written by the tool. |
| Side H Layer | text | selected foundation/group | Data label for this role, not a physical layer count. Use distinct names for filtering and inspect the parameters actually written by the tool. |
| Const. Layer | text | selected foundation/group | Data label for this role, not a physical layer count. Use distinct names for filtering and inspect the parameters actually written by the tool. |
Top and Bottom meshes: keep their counts separate
The two tables use the same fields with independent settings. Hold other values fixed when comparing: reduce @max to densify, then increase it to verify a reduction; changing diameter does not mean changing Qty. Picking a plan edge can change distribution direction, so inspect both PX and PY afterward.
| Field / button | Units / options | Condition and scope | Effect and verification |
|---|---|---|---|
| Top: Swap Layers (X-Y) | toggle | top mesh of selected foundation/group | Swaps the outer X/Y mesh for this layer. It does not rotate the host or directly change Qty; inspect PX/PY and a Revit section. |
| Top: Dir | X / Y | top mesh of selected foundation/group | Row direction follows the host/chosen boundary axes, not necessarily global project axes. Check the plan mesh colors. |
| Top: Ø | existing bar type | top mesh of selected foundation/group | Choose an existing model dropdown type and check its actual Type Properties diameter. A D20 name does not create a new type or alias 20-A-II. |
| Top: @max | mm | top mesh of selected foundation/group | Requested pitch for this X/Y row. Reducing 200→150 usually raises Qty, but compare @Act and Properties: a captured UI example had @Act greater than @max. |
| Top: Qty | bars | top mesh of selected foundation/group | Count in this direction, not both meshes or the whole foundation. After editing Qty, read the recalculated pitch and count the actual generated set. |
| Top: @Act | mm; read only | top mesh of selected foundation/group | Pitch derived from the distribution span and count. Compare the requirement rather than assuming it equals @max. |
| Top: Bend↓ / Bend↑ | toggle | top mesh of selected foundation/group | Enables bent ends for the current layer; top and bottom bend directions differ. Inspect actual geometry after disabling, not just annotation text. |
| Top: L / L/Hook | mm | top mesh of selected foundation/group | Bent-leg length, effective when Bend is enabled. Compare thickness minus covers/crossing layers and measure the leg in section. |
| Bottom: Swap Layers (X-Y) | toggle | bottom mesh of selected foundation/group | Swaps the outer X/Y mesh for this layer. It does not rotate the host or directly change Qty; inspect PX/PY and a Revit section. |
| Bottom: Dir | X / Y | bottom mesh of selected foundation/group | Row direction follows the host/chosen boundary axes, not necessarily global project axes. Check the plan mesh colors. |
| Bottom: Ø | existing bar type | bottom mesh of selected foundation/group | Choose an existing model dropdown type and check its actual Type Properties diameter. A D20 name does not create a new type or alias 20-A-II. |
| Bottom: @max | mm | bottom mesh of selected foundation/group | Requested pitch for this X/Y row. Reducing 200→150 usually raises Qty, but compare @Act and Properties: a captured UI example had @Act greater than @max. |
| Bottom: Qty | bars | bottom mesh of selected foundation/group | Count in this direction, not both meshes or the whole foundation. After editing Qty, read the recalculated pitch and count the actual generated set. |
| Bottom: @Act | mm; read only | bottom mesh of selected foundation/group | Pitch derived from the distribution span and count. Compare the requirement rather than assuming it equals @max. |
| Bottom: Bend↓ / Bend↑ | toggle | bottom mesh of selected foundation/group | Enables bent ends for the current layer; top and bottom bend directions differ. Inspect actual geometry after disabling, not just annotation text. |
| Bottom: L / L/Hook | mm | bottom mesh of selected foundation/group | Bent-leg length, effective when Bend is enabled. Compare thickness minus covers/crossing layers and measure the leg in section. |
Reinforcement: control the region and each direction
Start with one small zone so new bars are identifiable. L/W do not enlarge the host. After generation, check the added bars’ elevation relative to the bottom mesh rather than only overlapping lines in plan.
| Field / button | Units / options | Condition and scope | Effect and verification |
|---|---|---|---|
| Reinforcement: Draw | toggle | selected zone row; Draw enabled except for Draw itself | Enables this optional-role row. Retained field data alone does not imply generation; inspect the result and role summary. |
| Reinforcement: Zone | text | selected zone row; Draw enabled except for Draw itself | Identifies the reinforcement zone; renaming does not change its geometry. |
| Reinforcement: L | mm | selected zone row; Draw enabled except for Draw itself | Reinforcement-zone length, not full bent bar length; inspect the plan zone boundary. |
| Reinforcement: W | mm | selected zone row; Draw enabled except for Draw itself | Zone width, not host width. Check that the zone lies within the intended concrete face. |
| Reinforcement: X | toggle | selected zone row; Draw enabled except for Draw itself | Enables the X direction within the zone; it does not replace the row’s Draw switch. |
| Reinforcement: ØX | existing bar type | selected zone row; Draw enabled except for Draw itself | Type for X, independent of Y; inspect Type Properties. |
| Reinforcement: Y | toggle | selected zone row; Draw enabled except for Draw itself | Enables Y within the zone; count it separately when X is also enabled. |
| Reinforcement: ØY | existing bar type | selected zone row; Draw enabled except for Draw itself | Type for Y; changing it does not directly change X spacing or count. |
| Reinforcement: @ | mm | selected zone row; Draw enabled except for Draw itself | Zone reinforcement pitch, separate from the full bottom mesh. Check placement above the bottom layer within the correct region. |
Vertical and horizontal side reinforcement
The roles count differently: vertical side bars use edge pitch, while horizontal side bars use layer quantity. Changing horizontal Qty is not equivalent to reducing vertical-side @.
| Field / button | Units / options | Condition and scope | Effect and verification |
|---|---|---|---|
| Side Vertical: Draw | toggle | side-role row | Enables this side role; vertical and horizontal side reinforcement are separate. |
| Side Vertical: Shape | U / L | Draw-enabled row | Choose the offered U/L shape; inspect leg count and edge orientation in PX/PY. |
| Side Vertical: Dir | X / Y | Draw-enabled row | Chooses the vertical-side row direction; inspect which pair of edges receives bars. |
| Side Vertical: Ø | existing bar type | Draw-enabled row | Choose an actual type; its diameter affects clearance to the meshes. Inspect the side set’s Type Properties. |
| Side Vertical: @ | mm | Draw-enabled row | Distribution pitch along the edge, not horizontal layer count through thickness. Measure vertical-side bar spacing. |
| Side Vertical: Bend | mm | Draw-enabled row | Bent-leg length for this role. Check covers, thickness and intersecting meshes. |
| Side Horizontal: Draw | toggle | side-role row | Enables this side role; vertical and horizontal side reinforcement are separate. |
| Side Horizontal: Ø | existing bar type | Draw-enabled row | Choose an actual type; its diameter affects clearance to the meshes. Inspect the side set’s Type Properties. |
| Side Horizontal: Qty | layers | Draw-enabled row | Number of horizontal side layers through the thickness, not total perimeter bars. Inspect layer elevations. |
| Side Horizontal: Bend | mm | Draw-enabled row | Bent-leg length for this role. Check covers, thickness and intersecting meshes. |
Construction and Other Construction
Construction places U/Chair shapes on a grid; Other Construction creates additional layers in two directions. Neither replaces Top/Bottom meshes. Check available height before enabling either in a thin host.
| Field / button | Units / options | Condition and scope | Effect and verification |
|---|---|---|---|
| Construction: Draw | toggle | construction row | Enables this role; inspect its summary and actual generated elements rather than the canvas alone. |
| Construction: Shape | U / Chair | Draw-enabled row | Choose an offered U or Chair shape; their legs and support geometry differ. Verify in section/Properties. |
| Construction: Ø | existing bar type | Draw-enabled row | Construction bar type, independent of the main mesh; inspect the actual diameter. Verify in section/Properties. |
| Construction: H | mm | Draw-enabled row | Construction-shape height. At 0, verify the current version’s automatic sizing and measure actual H rather than assuming host thickness. Verify in section/Properties. |
| Construction: W | mm | Draw-enabled row | Construction-shape width, not distribution-region or host width. Measure the generated bar. Verify in section/Properties. |
| Construction: @X | mm | Draw-enabled row | Construction placement-grid pitch in X; reducing it densifies this direction only. Verify in section/Properties. |
| Construction: @Y | mm | Draw-enabled row | Construction placement-grid pitch in Y; check @X as well to determine total positions. Verify in section/Properties. |
| Construction: Bend | mm | Draw-enabled row | Construction-shape bent-leg length; check it does not cross covers or boundaries. Verify in section/Properties. |
| Other Construction: Draw | toggle | construction row | Enables this role; inspect its summary and actual generated elements rather than the canvas alone. |
| Other Construction: Layers | layers | Draw-enabled row | Number of other-construction layers through thickness; inspect their elevation separation. Verify in section/Properties. |
| Other Construction: ØX | existing bar type | Draw-enabled row | X-direction type for the other-construction layer, independent of Y. Verify in section/Properties. |
| Other Construction: ØY | existing bar type | Draw-enabled row | Y-direction type for the other-construction layer, independent of X. Verify in section/Properties. |
| Other Construction: @ | mm | Draw-enabled row | Pitch of the other-construction layer, separate from the chair @X/@Y grid. Verify in section/Properties. |
Quick Layout: enter settings, then verify them
Open the yellow Quick Layout button, check the target groups in Select Foundations, then the roles to apply. Read X/Y and Spacing/Bend fields within their own role, rather than assuming one field controls everything. After Apply, reselect each main-list host to detect unintended propagation. Test one host before applying to many groups.
| Field / button | Units / options | Condition and scope | Effect and verification |
|---|---|---|---|
| Quick Top: checkbox | toggle | foundation groups checked in Select Foundations | Selects the settings role to apply. Recheck role state and main tables after Apply; this is not a command to delete model Rebar. |
| Quick Top: X Diameter | existing bar type | corresponding role checkbox and checked target groups | Select an actual model type and check its diameter after Apply. |
| Quick Top: X Spacing | mm | corresponding role checkbox and checked target groups | Millimetres for the named direction/leg; inspect the main table and preview after Apply. |
| Quick Top: Y Diameter | existing bar type | corresponding role checkbox and checked target groups | Select an actual model type and check its diameter after Apply. |
| Quick Top: Y Spacing | mm | corresponding role checkbox and checked target groups | Millimetres for the named direction/leg; inspect the main table and preview after Apply. |
| Quick Top: Bend Length | mm | corresponding role checkbox and checked target groups | Millimetres for the named direction/leg; inspect the main table and preview after Apply. |
| Quick Bottom: checkbox | toggle | foundation groups checked in Select Foundations | Selects the settings role to apply. Recheck role state and main tables after Apply; this is not a command to delete model Rebar. |
| Quick Bottom: X Diameter | existing bar type | corresponding role checkbox and checked target groups | Select an actual model type and check its diameter after Apply. |
| Quick Bottom: X Spacing | mm | corresponding role checkbox and checked target groups | Millimetres for the named direction/leg; inspect the main table and preview after Apply. |
| Quick Bottom: Y Diameter | existing bar type | corresponding role checkbox and checked target groups | Select an actual model type and check its diameter after Apply. |
| Quick Bottom: Y Spacing | mm | corresponding role checkbox and checked target groups | Millimetres for the named direction/leg; inspect the main table and preview after Apply. |
| Quick Bottom: Bend Length | mm | corresponding role checkbox and checked target groups | Millimetres for the named direction/leg; inspect the main table and preview after Apply. |
| Quick Reinforcement: checkbox | toggle | foundation groups checked in Select Foundations | Selects the settings role to apply. Recheck role state and main tables after Apply; this is not a command to delete model Rebar. |
| Quick Reinforcement: Diameter | existing bar type | corresponding role checkbox and checked target groups | Select an actual model type and check its diameter after Apply. |
| Quick Reinforcement: Spacing | mm | corresponding role checkbox and checked target groups | Millimetres for the named direction/leg; inspect the main table and preview after Apply. |
| Quick Side Vertical: checkbox | toggle | foundation groups checked in Select Foundations | Selects the settings role to apply. Recheck role state and main tables after Apply; this is not a command to delete model Rebar. |
| Quick Side Vertical: Diameter | existing bar type | corresponding role checkbox and checked target groups | Select an actual model type and check its diameter after Apply. |
| Quick Side Vertical: Spacing | mm | corresponding role checkbox and checked target groups | Millimetres for the named direction/leg; inspect the main table and preview after Apply. |
| Quick Side Vertical: Bend Length | mm | corresponding role checkbox and checked target groups | Millimetres for the named direction/leg; inspect the main table and preview after Apply. |
| Quick Side Horizontal: checkbox | toggle | foundation groups checked in Select Foundations | Selects the settings role to apply. Recheck role state and main tables after Apply; this is not a command to delete model Rebar. |
| Quick Side Horizontal: Diameter | existing bar type | corresponding role checkbox and checked target groups | Select an actual model type and check its diameter after Apply. |
| Quick Side Horizontal: Quantity | layers | corresponding role checkbox and checked target groups | Horizontal layer count, not total perimeter bars. |
| Quick Side Horizontal: Bend Length | mm | corresponding role checkbox and checked target groups | Millimetres for the named direction/leg; inspect the main table and preview after Apply. |
| Quick Construction: checkbox | toggle | foundation groups checked in Select Foundations | Selects the settings role to apply. Recheck role state and main tables after Apply; this is not a command to delete model Rebar. |
| Quick Construction: Diameter | existing bar type | corresponding role checkbox and checked target groups | Select an actual model type and check its diameter after Apply. |
| Quick Construction: Spacing | mm | corresponding role checkbox and checked target groups | Millimetres for the named direction/leg; inspect the main table and preview after Apply. |
| Quick Construction: Stirrup Type | shape | corresponding role checkbox and checked target groups | Choose the construction shape and verify Shape in the main table. |
| Quick Construction: Bend | mm | corresponding role checkbox and checked target groups | Millimetres for the named direction/leg; inspect the main table and preview after Apply. |
| Quick Other Construction: checkbox | toggle | foundation groups checked in Select Foundations | Selects the settings role to apply. Recheck role state and main tables after Apply; this is not a command to delete model Rebar. |
| Quick Other Construction: Dia. X | existing bar type | corresponding role checkbox and checked target groups | Select an actual model type and check its diameter after Apply. |
| Quick Other Construction: Dia. Y | existing bar type | corresponding role checkbox and checked target groups | Select an actual model type and check its diameter after Apply. |
| Quick Other Construction: Spacing | mm | corresponding role checkbox and checked target groups | Millimetres for the named direction/leg; inspect the main table and preview after Apply. |
| Quick Other Construction: Bend | mm | corresponding role checkbox and checked target groups | Millimetres for the named direction/leg; inspect the main table and preview after Apply. |
| Select All / Deselect All | scope | Select Foundations | Checks/unchecks all Quick Layout target groups without changing the hosts loaded in the main window. |
| Quick Layout: Apply | action | checked target groups | Applies settings to target groups and closes Quick Layout; no Rebar is created yet. Inspect each host before Create Rebar. |
| Quick Layout: Cancel | action | Quick Layout dialog | Discards confirmation of this Quick Layout edit; it does not delete existing model bars. |
Change exercise
Keep cover and diameter fixed and reduce bottom-X @max from 200 to 150 mm. Quantity should not decrease and actual pitch must fit the distribution domain. Test 200 mm on another copy to reduce density. Swap Layers changes X/Y elevation order rather than bar counts. These are proposed exercises; this batch has not confirmed 2.0 output.
Read the window on a project host
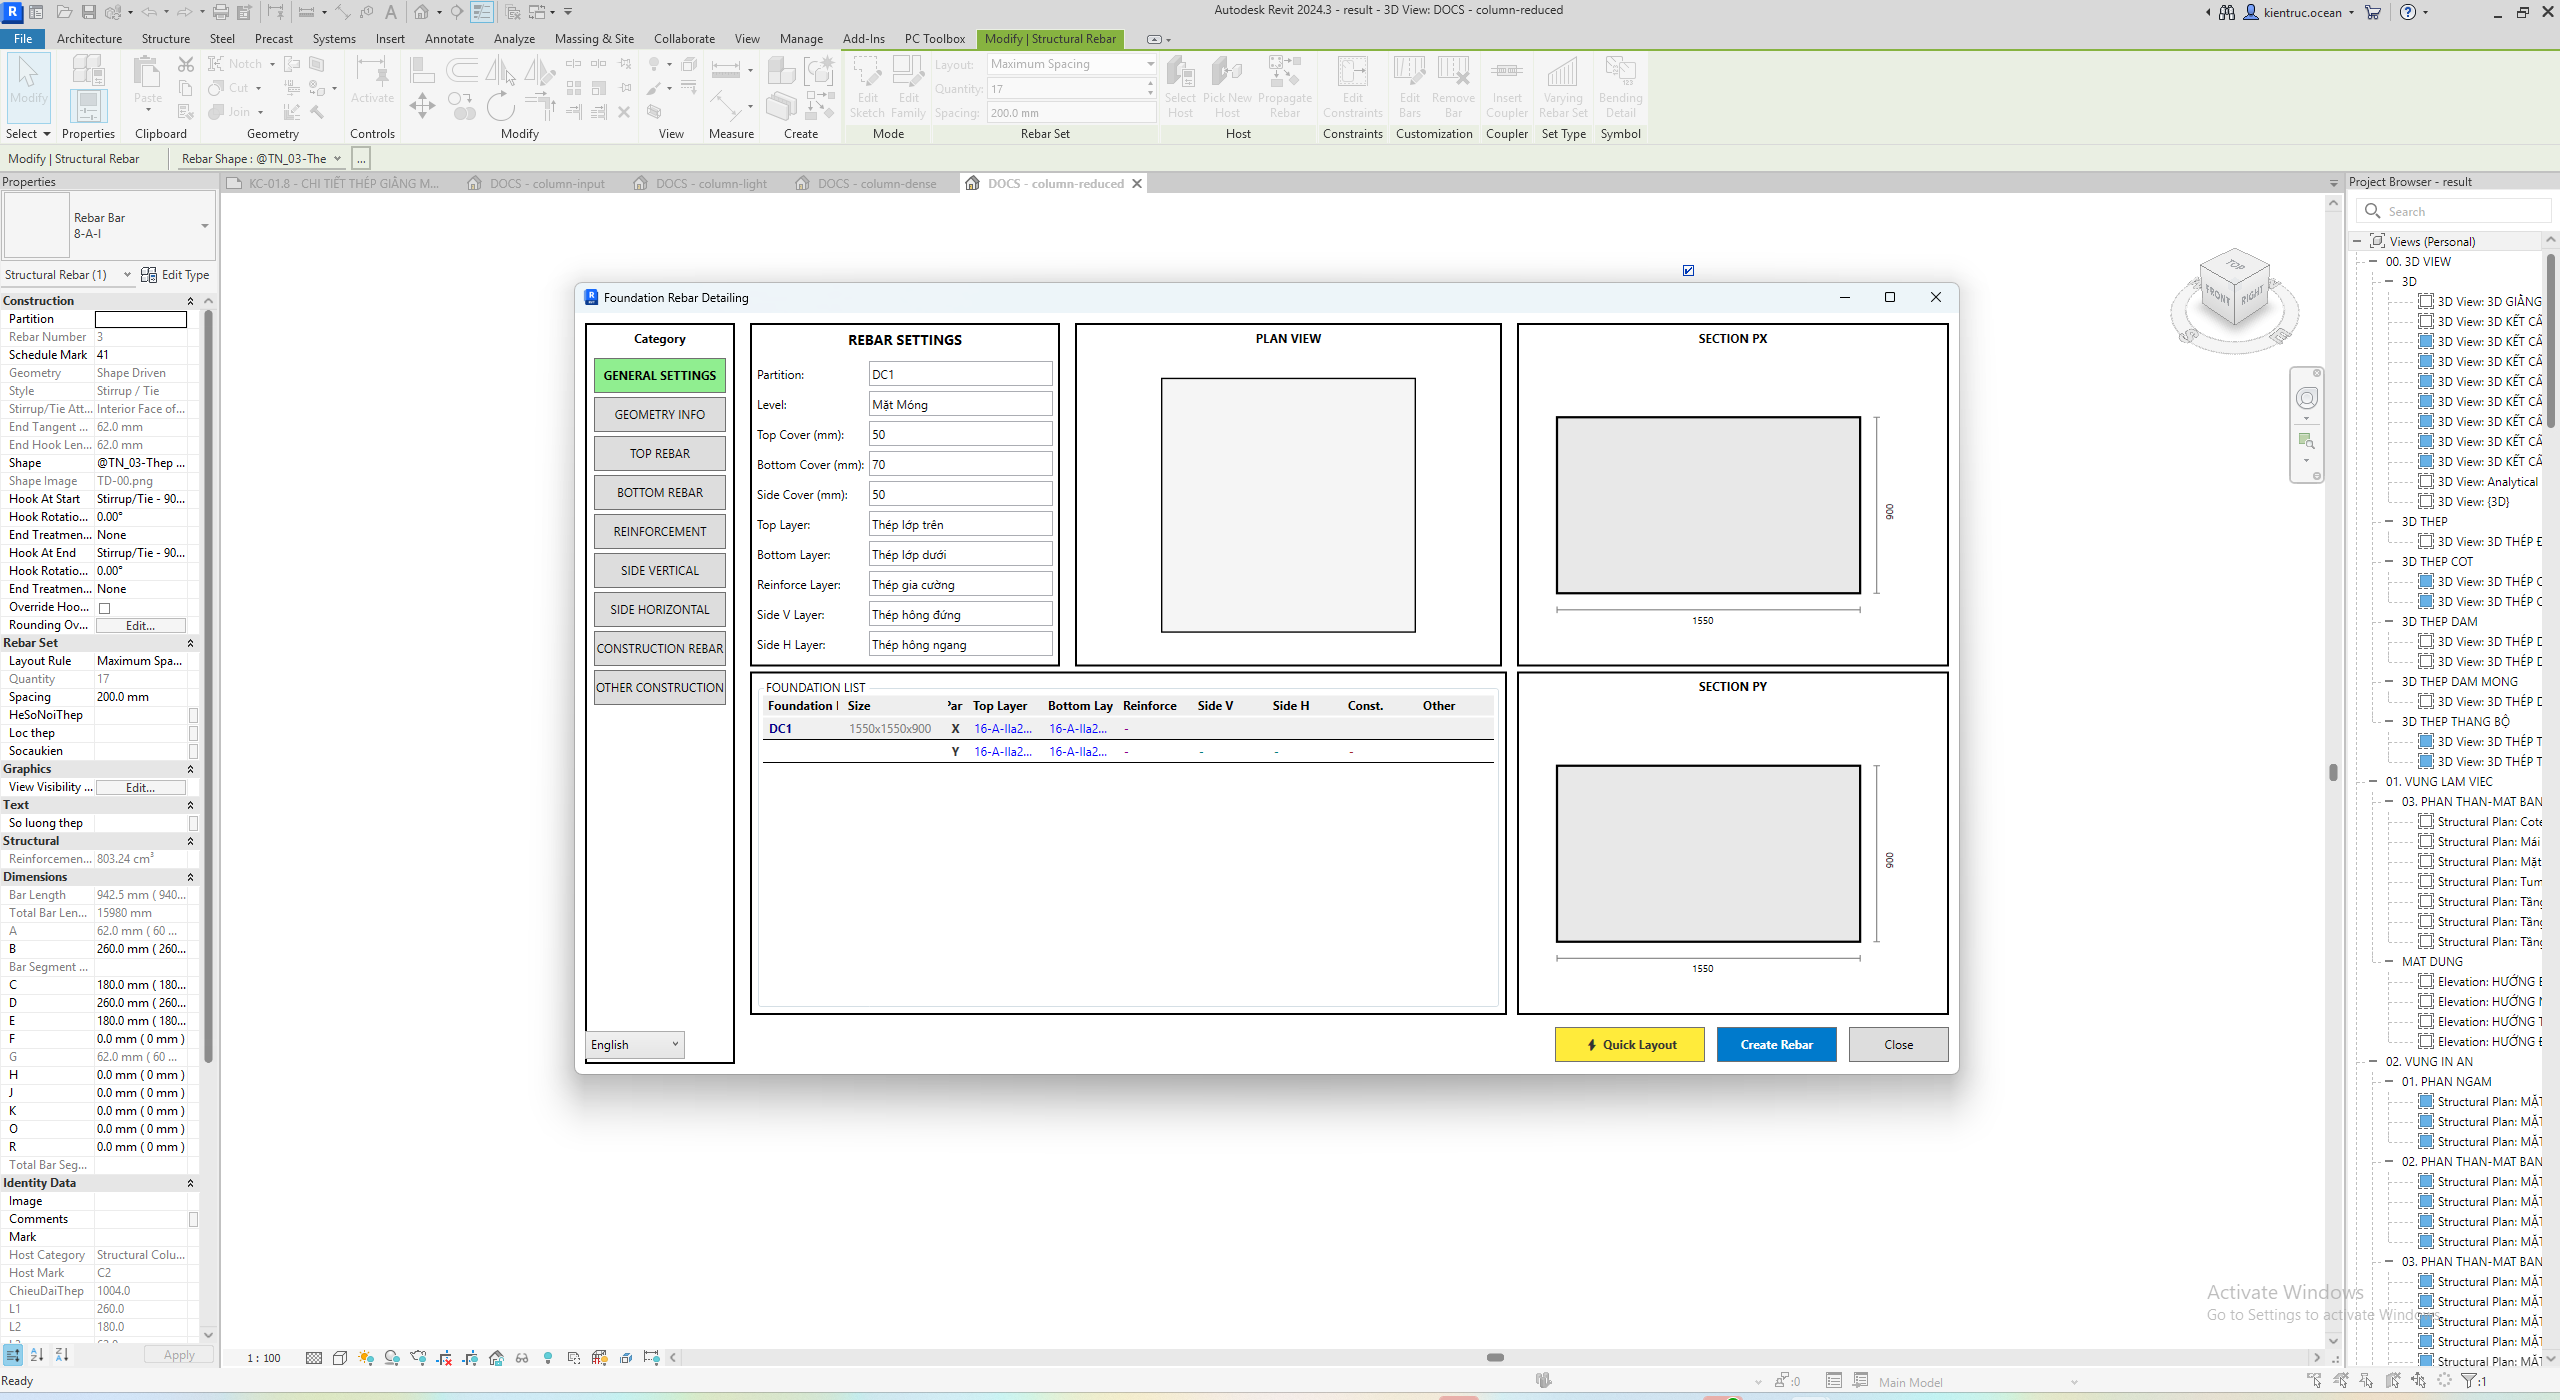
These captures show the actual English UI in Revit 2024.3 on project pile cap DC1. Vietnamese level and layer names are model data. The UI reports 1550 × 1550 × 900 mm; compare actual concrete faces in a section because the bounding box can include blinding. Do not treat its depth as structural concrete thickness.
The Bottom preview shows @max=200, Qty=8, @Act=207 and Bend/L enabled at 300 mm. The model creation produced four sets with Quantity=9 per set. Preview counts, element-count messages and total physical bars are different. Select actual sets in Revit to inspect Quantity, Layout Rule and distribution spacing rather than treating @max as a measurement.
Selecting a foundation can automatically reset Bend/L from its thickness. Recheck both fields after changing hosts, then inspect bar ends against real concrete. Reinforcement extending beyond its host needs review before use; these UI captures are not an accepted-cover example. The private project RVT is not offered for download.
1: covers and layer names for the current cap; 2: host list with X/Y rows; 3: Quick Layout edits settings, while Create Rebar creates elements.
1: Swap Layers changes X/Y elevation order; 2: read Ø, @max, Qty, @Act and Bend/L together. The preview shows Qty=8 and @Act=207 despite @max=200; check generated sets separately.
Actual Quick Layout: 1: roles and their fields; 2: checked destination groups; 3: Apply/Cancel. Opening the dialog alone does not apply its displayed values.